DIY Easter Baskets
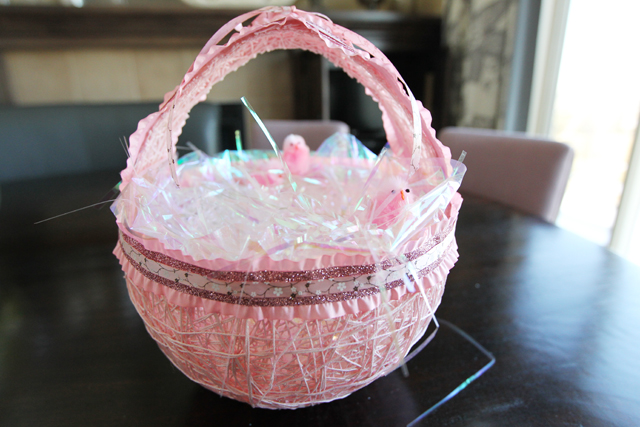
Growing up we always had the most wonderful homemade Easter baskets that my mother made for us. What I loved most is that you couldn’t find them in a store, and not a single other friend of mine had the same one. Those little baskets are still put out every year at my mom’s house, still holding up strong, and they’re filled with decades of memories. Needless to say I wasn’t sure if I wanted to share this little family tradition, but it’s just too wonderful not to. All the credit goes to my cute little mom and her crafty little self. Happy Easter everyone, have a fabulous weekend!
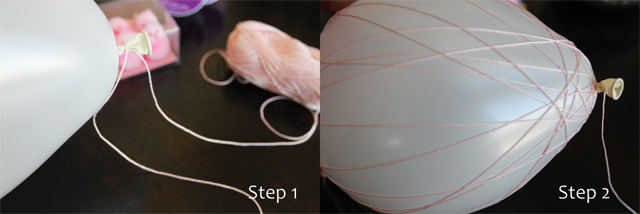
Step 1: Blow up balloon to the desired size that you would like your basket. Tie the end of the string to the balloon, making sure you leave approximately 30cm on the end.
Step 2: Start wrapping the string around the balloon. It’s easiest to go lengthwise to start off. Once you’re done with one bundle, tie it to the beginning of the next bundle and continue until you have used all three or gotten the desired coverage.
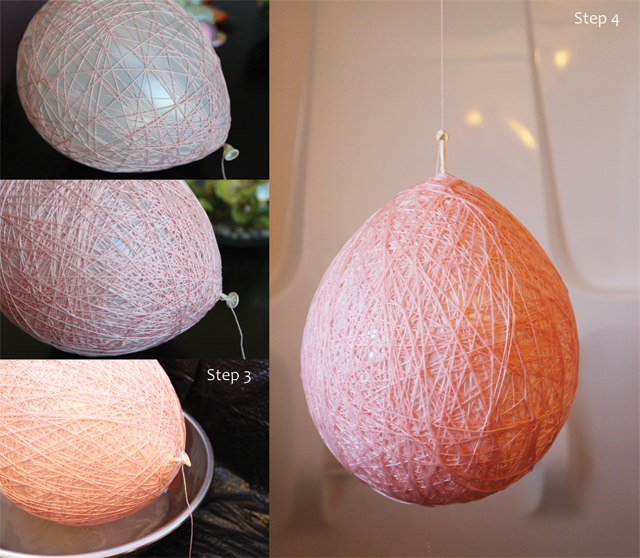
Step 3: Using a large bowl in the bathroom (covering the floor with garbage bags) create a water/sugar bath. One part warm water to two parts sugar. (You can add glitter to the water if you want your basket to have some sparkle.) Roll your balloon until it is thoroughly covered with the sugar water.
Step 4: Using the bit of string you left at the beginning, tie your balloon to the shower rod in your bathtub. If some strings come loose, don’t panic, once you tie your balloon up, you can re-wrap your string around the balloon. Once the balloon is nearly dry, you will need to cut it down and roll it again in the sugar/water solution. Rolling twice ensures an extremely durable basket. Once will not be enough.
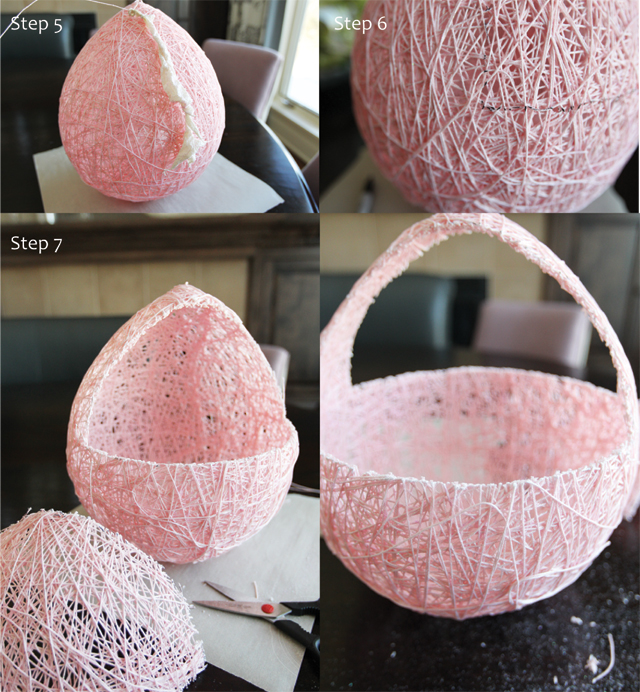
Step 5: Once your basket is dry but there remains an approximately 2 inch diameter wet spot on the bottom, cut it down and place on parchment paper. Press down on the wet bottom to create a flat surface so your basket will be able to sit on its own. Pop the balloon.
Step 6: Draw out the area you wish to cut out to create your basket. I like to use a ruler to measure from the table up to ensure a straight line across the front of the basket.
Step 7: Cut out the drawn out area. Once you do so, you may use that first piece as a stencil to cut the other side. Remember this is a homemade project, it doesn’t have to be perfect.
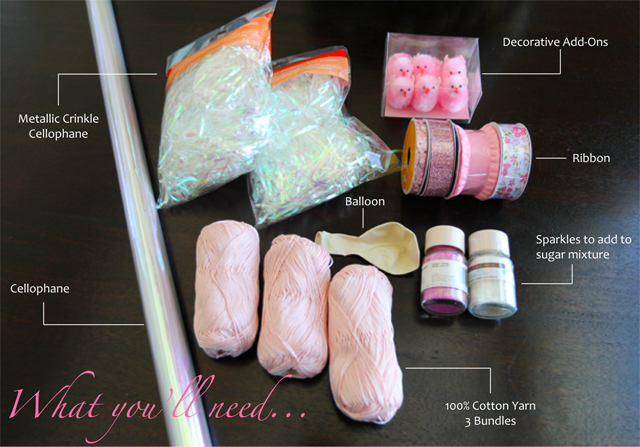
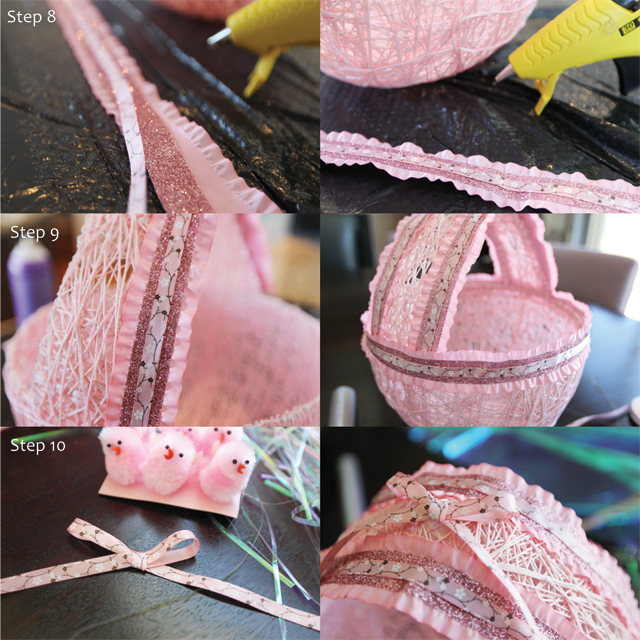
Step 8: I like to glue multiple layers of ribbon together to create a multidimensional look. Hot glue gun works best. If your ribbon is too thin the glue will show through, so pick a thicker ribbon or do a couple of layers.
Step 9: Glue ribbon to basket, starting with handles first. After the handle go all the way around the top edge of the basket.
Step 10: Cover the hole at the top of the handle by creating a bow in matching ribbon and gluing on top.
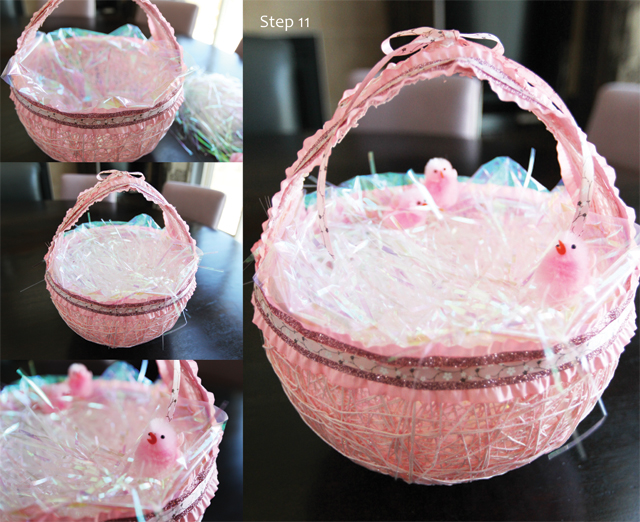
Step 11: Add your cellophane on the bottom of the basket, and fill with the metallic crinkle cellophane. Add any finishing touches or decorations, such as furry chicks, and you’re finished. Wait for Easter Bunny to fill with chocolate.
60 Responses to DIY Easter Baskets
Leave a Reply Cancel reply
The Latest
Archives



[…] Molded Balloon Baskets – Get your kids in on making their own Easter baskets. They’ll love how magically these […]
i enjoyed it should i cook the water with the sugar or just mix it with warm water.
Hi Nathalie! Heat the water separately and then add in the sugar, stirring until it dissolves! Hope this helps!
Hi there I am trying to do this tonight but I bought yarn instead, do you think that could work?
Hi Karina! I’ve never tried it with yarn, although I feel that it could work and create a really fantastic look! Just remember to get good coverage with the yarn around the balloon. Also, the yarn may soak up more of the sugar water liquid and may take longer to dry. Good luck!
This is darling. We always made the eggs that had a hole in the center. We used crochet thread not baby yarn. Thank you for sharing your family tradition.
Thanks Theresa, it’s family tradition that was just too good not to share 🙂
This is such a wonderfull idea! Definitely going to use this idea this easter thanks alot for all your great ideas
Thanks so much Jennifer!
What size yarn did you use?
Thank you for sharing. I’ve decided to make these for my kiddos this Easter. How long does it take to dry?
Hi Janelle,
The size of yarn can vary a bit, I use yarn that’s thicker than embroidery thread, but not as thick as the wool you would use for knitting. As long as you make sure it’s 100% cotton you should be fine, you would just get a slightly different look depending on the thickness. (I would err on the side of thicker than thinner if you’re between a couple of options).
If you’re able to hang them in the evening they should be dry by late morning. Remember when the bottom is a bit soggy to cut them down and create a flat bottom (as per the instructions).
Also, use regular granulated sugar, NOT fine granulated sugar. The fine granulated sugar doesn’t harden…if you can’t find any in your grocery store than you can always dissolve sugar cubes in the water as they are not finely granulated.
Hope this helps, have so much fun creating them with your kids:)
[…] Project Source and Details – centrestreetstyle […]
[…] DIY Easter Basket from Center Street Style […]
I really want to make these for my kids this Easter! But I can’t seem to find how much sugar to use? Am I just totally missing this? I keep looking and re reading the article. Thanks!!
After typing that comment, I see it now! It’s too early for this type of thinking apparently! 🙂
Lol I completely understand, I need at least a couple cups of coffee before I’m functional in the mornings! Your kids will truly treasure these baskets. I still have and use the original one my mom made me from the 80’s 🙂
[…] This is an easy and beautiful basket for kids to go egg hunting, and it’s so smart to use the string to make a basket by mod podge the balloon and string, then cut out both side and add embellishments, which looks like a nest. Easy and creative from center street style! […]
Hi, I like to make this with my kid, but I can’t get the string to stay around the balloon in the beginning. Any tips? Thanks.
Astrid from the Netherlands
Hi Astrid! It’s true, getting the string to stay on the balloon at the beginning is the most difficult part! My tip would be to hold the balloon upright, with the tie at the top, and slowly and firmly wrap it lengthwise (vertically). Wrap it once all the way around and then the second time, wrap it going in a perpendicular (90 Degrees) direction so it looks like an X from the top and bottom. Do this a couple of more times filling in the holes as you go and then I would do a couple of wraps horizontally around the middle of the balloon. Once there’s more string on the balloon it gets easier, I promise!
What an awesome tutorial!!!! Thanks for sharing!!!! I’m just curious, using a sugar water mix to stiffen makes the yarn/wool candied?? Wouldn’t this attract ants??
Cheers 🙂
Hi Carmelina! That’s a great question! I live in up in Alberta, Canada where it’s quite cold much of the year, so we don’t experience the same issues with ants and other insects that warmer climates do. In all the years that we’ve made and stored the baskets we’ve NEVER experienced issues with ants or insects, although I can see that in a warm, humid climate that may very well be an issue. Perhaps storing the baskets in plastic wrap would help? Cheers!
I used a clear glossy spray paint after as I live in lake havasu city az
What a fantastic idea Krystle! I’ll have to try that sometime.
[…] little girl would love to carry this basket on her delicate wrist as she hunts for eggs this […]
[…] image credit to centrestreetstyle.com […]
Would p.v.a glue work?
I’m not sure pva glue would work. When you submerge the balloon covered in string in the sugar water you’re able to ensure that every strand is covered. I’m not sure you would be able to ensure that the glue is covering the strands of thread from every possible angle the same way, although you could always try the technique on a very small balloon to see what the results yield!
[…] For the full tutorial please visit How to: Easter Basket. […]
Hello, thank you for sharing, it was fun fir me and my girls but I’m still not done. The sugar water isnt working they are still wry how long does it take from them to dry. Also how much sugar and water do I use ? Is it suppose to be a little thick? Thank you hope to hear from you soon
Hi Liz! If the sugar water isn’t working it could be a couple of possibilities. If your balloon completely dries and the yarn is not hard then it’s a sign that either you didn’t use enough sugar in your sugar/water mixture, or the sugar was too fine. In either case I would make a new sugar/water mixture, using more sugar and perhaps switching up the sugar you used to sugar cubes which is a more coarse sugar. Cut down your balloon and completely dunk it in the new sugar/water mixture and rehang it to dry. It will take 24-36 hours to dry. This has happened to me before and it’s usually one of those two issues. Use a more generous amount of sugar than you did the last time, and again, check your sugar to see if it’s fine or coarse. Extra fine sugar doesn’t work well with this technique. Sugar cubes work amazingly well. Good luck, they will turn out beautifully, you just need to redunk!
crochet thread works beautiful as it is thinner than the 100% cotton. I’ve made mine years ago in the 80’s and still use them today. I would use an inverted bowl to lighted push down the bottom of the crochet covered balloon before breaking the balloon. It created an indent on the bottom of the egg so it would stand easily. I sure love the basket and will making myself one. Just gorgeous. Happy Easter!
Thanks so much Dolores! I hope you have a wonderful Easter as well!
[…] Paasmandje […]
[…] There are also two “golden egg” options in the form of rabbits and chicks to hide a special treat somewhere along the way. And of course, to collect all of their findings everyone needs a DIY Easter basket! […]
Ok I will go buy cube sugar today, you did say it takes about 24 to 38 hours to dry right is there any way I can dry it fast like if I put it on a fan or hair dryer, I’m asking because easter is right around the corner .. thank you. Is there anyway you can email I didn’t get your response until now dje1324@gmail.com thank you hope to hear from you soon
Love this! Working on it now, although I was just reading that you say to “submerge” the balloon in the sugar liquid. How much do you generally make that you’re able to submerge the whole balloon? I used 1.5 cups water and 3 cups of sugar and it was just barely enough to cover it, and I had to roll it around in the liquid. That was just for the first coat of the sugar liquid!
Hi Kristin! That’s exactly what I do! The term “submerge” may a bit misleading, and more accurate when you’re making multiple baskets and therefore have a larger amount of the liquid mixture. More often though when I’m making just one basket I’ll use approximately 3 cups of water to 6 cups of sugar, but it really depends on how large of a balloon basket you’re making. You’re doing it exactly right! Let me know how it turns out!!
[…] Tutorial via centrestreetstyle.com […]
[…] For the full tutorial please visit How to: Easter Bunny Jar. […]
[…] is a bit more labor intensive, but the results make it worth the extra steps. Get the tutorial here. See the […]
Hiya ! I have a few questions about the basket of course it’s not Easter anymore but I’m thought of making one as a decor for my house , I have followed all the instructions above step by step however it’s been 36h now, for my basket after the first sugar bath it’s not completely dry I used less yarn because it is rather expensive and hard to find where I’m from but anyway it’s quiet weak and bendy my question is , is this normal will it harden after second sugar bath or have I done something wrong .?? My other question is would would it be alright to lightly spray paint the basket after … Thank your in advance 🙂
Hi Jenny! So if after 36 hours the basket is still not dry and hardened, you’ll need to add more sugar to your water the next time around. I use 2 cups of sugar for every 1 cup of water, but perhaps you may have to up it to 2.5 or even 3 cups if it’s not getting hard enough. Also, I’ve found that working with extra fine sugar does not make the basket as strong and hard as using granulated sugar. So perhaps check the sugar you used and try to get your hands on some coarser stuff.
I think spray painting after it’s dried is a fabulous idea and would look wonderful!!
[…] This is an easy and beautiful basket for kids to go egg hunting, and it’s so smart to use the string to make a basket by mod podge the balloon and string, then cut out both side and add embellishments, which looks like a nest. Easy and creative from center street style! […]
Wow, thank-you for sharing! This is such a wonderful idea! Can’t wait to see how it turns out!
Thanks Jen! I hope it turns out wonderfully for you 🙂
I have a question when my balloon drys I can see where the sugar water dried why doesn’t it dry clear I don’t lime the way that looks is there a trick to make it dry clear so u don’t see that. It only shows on the darker yarn.
Hi there! This has yet to happen to me but I wonder if perhaps the sugar wasn’t dissolved enough in the water? To remedy the look of the dried sugar on your yarn I would mask it with glitter or sparkles. I would use an adhesive spray around the balloon and sprinkle on a generous amount of crafting or fine sparkles. You could also paint or spray paint the basket before decorating it to help with hiding the dried sugar on your Easter Basket. I hope this helps!
[…] DIY Easter Basket […]
[…] IMAGE SOURCE: CENTRESTREETSTYLE […]
[…] http://www.centrestreetstyle.com/2013/03/29/diy-easter-basket […]
I live in New Zealand and saw this while searching for something different to do with my grandchildren. I also started a group here in my hometown to help fmailies struggling to make ends meet, by suppling food hampers and other hampers. this is done by running auctions for food. so am going to make some of these to giveaway at easter with easter eggs in them. absolutely brilliant. thank you for sharing.
That is such a wonderful idea to do for a giveaway, as well as for your grandchildren! My Mom made me a basket in approximately 1990 and she still pulls out that same basket every Easter to fill it with sweet treats for me. These are truly special pieces and whomever gets your homemade basket will surely treasure it for years to come!
[…] Centre Street Style […]
[…] 27. Pretty Pink Easter Basket Tutorial for a Newborn Baby Girl […]
How much is 1 part water?
How much is 2 part sugar?
Like exact measurements?
Hi there! It means it’s a 2 to 1 ratio. If you do 1 cup water than you add 2 cups of sugar. If you do 2 cups of water, than you add 4 cups of sugar. If you’re doing just a single basket you may be able to get away with a single cup of water, but you’d be safer to do two off the bat so you can really soak the thread to make sure it hardens as much as possible.
Hope this helps!
Mikki
[…] Damask Love Crochet Bunny Basket from The Lavender Chair Yarn Egg Easter Basket from Centre Street Upcycled Coffee Can Easter Basket from […]
[…] Mikki Fox wins some serious creativity points with her knitted balloon Easter craft. As beautiful as it is, it’s much less complicated than it appears. This Easter Basket will become an easy holiday staple; fun for all ages yet classically beautiful in its finish. […]
[…] DIY Easter Baskets by Centre Street […]